
The TooleAudio BantamDAC
Checks and Setup
|
The BantamDAC is a full-featured implementation of the PCM2702. However, the PCM2702 is itself a combination chip containing DAC, analog out, clock, and USB interface. Because of that, the Bantam's entire circuit consists of the recommended resistors and capacitors to associate with the pins of the DAC chip itself, plus two regulators and their associated parts - one for the digital 3.3V supply and one for the ~5V music output supply. Add an LED and resistor, and you have the summary of the entire circuit.
Because of that, there is nothing to setup and very little to check for troubleshooting. One exception is to ensure that you connect the BantamDAC to a USB power source for a few minutes before you connect it to an amp. With a direct-coupled DAC such as the BantamDAC (or AlienDAC, too), the only protection for the DAC chip on the analog outputs (Left and Right music channels) are the coupling capacitors, CL and CR. However, these capacitors may take a full minute or more to fully charge. There are some types of amplifiers that will present DC offset through the RCA jacks. Because of this and to be perfectly safe, you need to ensure that the BantamDAC CL and CR caps are fully charged by connecting it to USB power for a minute or two before connecting to or turning on your amp. Other than checking the integrity of your construction, this is the only "setup" that you need to do. Typically, there are three things you should check upon connecting your BantamDAC:
|
|
Does the LED light up? In this instance, there are a couple of things that can go wrong: 1) the LED is reversed ("+" is to the right), or 2) there is a problem with the LED resistor. The LED is completely independent from the DAC operation. If the USB connector is good, the resistor and LED installed properly, the LED will light. Does the PC/computer recognize the DAC? There are essentially two problems that can occur here: 1) the 3.3VDC regulator (IC1) is not operating properly, or 2) there is a problem with the DAC chip. Refer to the pic below for testing the voltage from the IC1 regulator. If you don't measure something close to 3.3VDC across the C11 capacitor, then the regulator is the issue. Does it output music from the PC's OS media player? As with the above, there are essentially two problems that can occur here: 1) the 4.75VDC regulator (IC2) is not operating properly, or 2) there is a problem with the DAC chip. Refer to the pic below for testing the voltage from the IC2 regulator. If you don't measure something close to 4.75VDC across the C13 regulator, then the regulator is the issue. 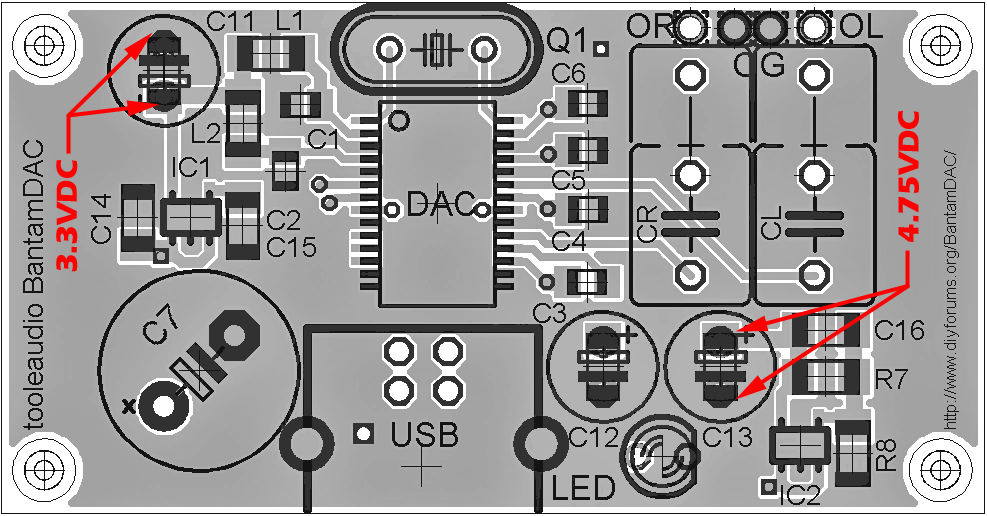
In the case the DAC chip is the problem issue remaining, verify continuity between the pins and their associated traces/planes on the board - very carefully. You can short out the pins and perhaps fry the DAC chip by just measuring resistance, because a small amount of current is injected into the pins by the multimeter. In case the worst happens, don't lose hope - there are people who have completely removed the DAC chip and successfully replaced it. Refer to the SMD soldering section for tutorials on removing SMD chips. Basically, the technique consists of creating a solder blob large enough to cover the complete set of pins on each side. Then alternately heat and lift until one side and then the other is removed from the board. Good luck with your BantamDAC!! |
